In my other blog post, I documented the stop/start challenge I had building a War Pi. Now that all the equipment is ready, it’s time to actually start building. I’ve picked up a number of tips and tricks along the way, and I’ll be documenting them here.
The War Pi is a Raspberry Pi project running Kismet, with GPS enabled. The project is a SANS Gold Paper project by Scott Christie;
you can read the paper here. For the WarPi to work “mobile”, you need the following:
- Raspberry Pi
- SD Card (4 GB or larger)
- Alfa wireless network adapter
- USB GPS
- USB battery pack
- Misc USB cables
Here’s my setup:

Operating System
The first step was choosing from the several options for operating systems. The folks at RaspberryPi.org are awesome about building, updating and releasing operating systems (
you can find them here). I chose Raspbian because it is the most common OS, and because it was the base OS for the WarPi build. There’s potentially a reason to go with one of the OS’s (for instances, Arch Linux), to have a smaller kernel and such. For the purpose of this project, sticking with the norm is probably the best solution.
Configuring the OS
I’ve written a longer blog on how to image, update, upgrade, and reimage the Raspberry Pi operating system,
you can read it here. These are the steps I took to get to my current base image.
Customizing the Hostname
My base image includes SSH server running at startup, so I can get logged in whenever it’s live on a network. One thing I like to do is customize my hostname—in this case, it’ll be “WarPi”. Some people recommend a stealthier name, but given that the WarPi will only be used for client engagements, I want to be completely transparent.
There’s a nice article on the steps to accomplish this.
You can read it here.
Expanding Filesystem
Scott Christie’s article calls for expanding the file system as a first step. I don’t do this, because once the system is built I want to image it back off. If I expand the file system, my image will be quite large (my card is 6 GB). So I’ll hold off until all the apps are installed and working.
Next: build the WarPi.
Installing Applications
Scott Christie’s WarPi build follows these steps:
- Install and configure GPSD (the GPS Daemon)
- Install and configure Kismet
- Auto-start Kismet
GPSD – The Good, the Bad, the Ugly
In
my initial efforts to build a WarPi, I was using an older Microsoft Streets and Trips GPS device. My early proof of concept was just using it with minicom to review serial communications –
that worked fine and I blogged a bit about it. When I combined GPSD and my old GPS unit, however, I ran into trouble and learned a lot about
debugging GPS units. Unfortunately, it appears GPSD fried my old SiRF GPS unit – even though I’ve got it back to NMEA mode, the unit cannot get a GPS fix anymore. So I’m understandably wary of GPSD. In some testing I did the other day, I discovered that Kismet works fine with my new GPS unit in NMEA mode over serial, so my plan now is to skip the GPSD installation and let Kismet speak serial/NMEA to the GPS.
Therefore, my build steps will be:
- Test the GPS
- Install and configure Kismet for serial NMEA GPS
- Test Kismet with the GPS
- Auto-start Kismet
Step 1: Testing the GPS
Install Minicom
Minicom is a great little serial tool, but it doesn’t come preinstalled in the OS, so we’ll be installing that prior to using the GPS. Simple:
sudo apt-get install minicom
And voila – you have minicom installed! To make sure it works, enter the following:
sudo minicom –s
And the minicom app will start at the settings screen:

Just choose “Exit from Minicom” by arrowing down—we have to get the GPS working before we can use minicom.
Connect the GPS
When you connect the GPS over USB, the sudden change in power can cause your Pi to restart. The best strategy is to shut down your Pi, connect the GPS, and then power up.
Once the system boots, you’ll need to discover your GPS’s “location” in the system. Type the
dmesg command and scroll through the output looking for “USB-Serial” or such. Eventually you’ll see a series of entries for the GPS, ending in “pl2303 converter now attached to ttyUSB0” or something similar, as highlighted below:

Now you’re ready to use minicom to view NMEA strings coming from the GPS. Type:
sudo minicom –s
to enter the settings screen. Let’s get going!
- First select “Serial Port Setup” by mousing down to it and pressing the Enter key.
- Next, press the “A” key, then backspace and edit the entry to read /dev/ttyUSB0 (or wherever your GPS unit ended up). Then press “Enter” to set your changes.
NOTE: the location for your GPS is case sensitive!

- Now we need to modify the serial communications settings. Press “E” to open the Comm Parameters menu:

- Press “B” until the Current comm speed is 4800:

- Make sure the “Current” reads 4800 8N1 as above. If it doesn’t, press “Q” to set the second half of the string.
- Once the settings are correct, press “Enter” to exit each screen (two times).
- Now arrow down to “Save setup as dfl” and press “Enter”
- Next, arrow down to “Exit” and press “Enter”. You will drop directly into minicom and see NMEA strings pass by…
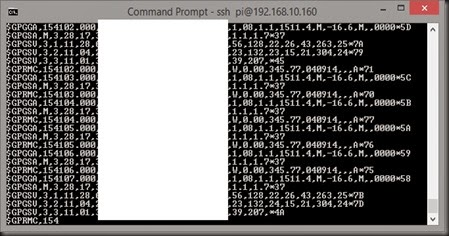
The big white box is an attempt to anonymize my location.
- To close out of minicom, press “Ctrl+A” then press “Q” and choose to leave without reset.
Installing Kismet
It’s actually not an “install” per-say, but a download and build. Christie’s instructions are still accurate – the link is correct as of September 2014, and the instruction steps are all accurate. I’ll summarize:
- First perform the wget command to download the source.
- Next, install the dependencies as documented
- Then extract the source
- Then prepare the code to compile and install
- Finally, make and install Kismet
The make part… That takes a long time. Be patient—go for a walk with the dog, spend time with family, etc.
UPDATE: 03/2016
NOTE that there is a bug in Kismet, so it places access points all over the antarctic. Not kidding. See
this Kismet forum article for details on how to fix it (you're going to have to modify code).
If you look for the K7JTO repository on Github, you can download the updated Kismet files, or just hand-fix them yourself.
Configuring WLAN0 Out
By default, Raspbian wants to hot-plug and use a wireless device as much as it does an ethernet device. Kismet however wants full access to the WLAN device, so it will squawk at you:

I poked around quite a bit, but ultimately fixed this by editing
/etc/default/ifplugd and changing the line
INTERFACES=”auto” to
“INTERFACES=”eth0”

This instructs ifplugd to only look at eth0 to autoconfig, and not to the WLAN. Inconvenient if I actually want it to auto-configure a WLAN connection, but I actually don’t want it to. Kismet needs full control of wlan0.
Smoke Test
This is a good time to make sure Kismet is working. It’s simple – just type
sudo kismet
If it’s working, you’ll get a bunch of prompts as recorded in the whitepaper. Eventually you’ll see the Kismet server logs, which will look like this:
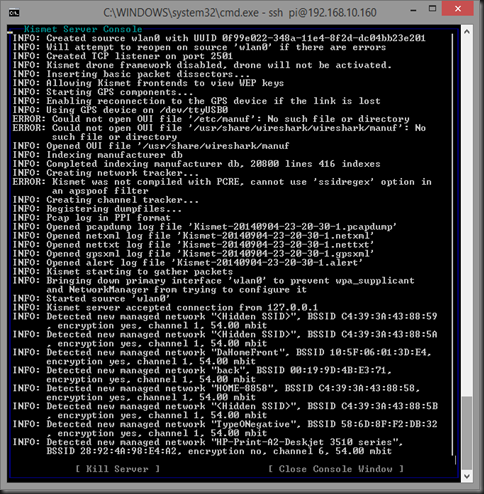
Pressing the Tab key will highlight the “Close Console Window” and take you to the Kismet interface, which will look like this:

(GPS coordinates blanked out)
If you’ve gotten this far, you are golden – configure Kismet to auto-start and to log output and you have a WarPi. Congrats!
From this point on, you can follow the WarPi directions in the article and everything should go just fine. NOTE that you might want to use dd again to make a base WarPi image so you don’t have to go through all of this again if your card dies or something.


 and
and


